Volgers

woensdag 19 december 2012

X-mas house part 9: side table & more deco

I wanted to make a miniature scene for my miniature scene. The 'glass' is the cap of a spraybottle.

And the house needed a side-table, to put the decorations on. I just love lasercut wood, so easy for a beautiful result!

And this is the endresult:

The inside is getting cosy, the outside is still bare. And I still need a window and a stove. I need to get busy to get it all done for Cristmas. I have the day off tomorrow, so I hope it will be more complete in the evening.

Have a fun Thursday!
Marit

maandag 17 december 2012

X-mas house part 8: starry etagère

The technique of the previous post can also be used on tealight cups. This metal is thicker and stronger, not suitable for detailed features, but very suitable for... a etagère, for example. I have a etagère of Riverdale, with plates in the shape of stars. Left the etagère as sold by Riverdale, right my miniature version, 2,3 cm in height.

This is what I used. The blue thingie is a piece of soft plastic foam.

I punched a bigger and a smaller heart. I used the big embossing pen on one side of the metal, on the entire star except for the borders.

Then I turned the metal upside-down, and worked on the borders with a small embossing pen.

I repeated both treatments 2 times for the best effect. It makes the metal smooth and shiny. A hole is pinced in the middle,  first with a needle to make the hole, and second with the earring-stud (if you understand what I mean, it is visible in the second picture) to make it fit.

Time to assemble, using a bit of glue to stabilize it. The top-ornament is also from jewelry-making, to make a hanger of a sphere.

Hope you like it!
Marit

zondag 16 december 2012

X-mas house part 7: mirror

This post is about a technique I love, and I used it to make the angel-ornament of the mirror. Every fireplace deserve a beautiful mirror.

Start with something to eat, something which needs a new package to be opened, a package with a thin metal foil, like this. I collect these foils, together with other waste which might be useful for miniature-making in a box in my kitchen. Anyone reckognizes this? ;-)

Further I need my embossing pens and an nice ornament. I use a standard ornament here, but it could be anything: a beautiful relief on a winebottle, jewelry, etc.

Place the foil over the ornament and start with the largest embossing pen on the outside of the ornament, then the smaller ones for getting the details in the foil. Be careful, don't make the foil crack. Because of the bit of texture in the foil, it is quite capable to fit sharp bends, but not instantly.


I rubbed a bit of white paint on it, and cut the edges, and then took the ornament out, back into its jar for the next time or another project.

The foil-ornament can be bend to fit the shape of the mirror, unlike the original ornament.

The mirror itselve is made of mirror-pieces and wooden lathes. A bit of white paint and silver wax finishes it off.

I love this technique as it uses waste, nothing else, and gives such stunning results. The possibilities are endless. 

I hope you find this useful too,
Marit

zaterdag 15 december 2012

X-mas house part 6: door & wreath

This week I have been working on the door, from time to time.
On the door are some leftover sticks, made for the walls. I find it so hard to get a 45 degree angle on them, to fit them in a square. And with 8 sticks on each side of the door, each with two angles... pfff! The doorhandles come of a halogen light bulb.

The wreath is made of a sort of brush stick, don't know the English name (pijperager in Dutch), painted green, and Lycopodium green glued on it (leftover from making the Christmas tree, see part 4).

The door has had three different colours thoughout the week. First I painted it white, which was good for the inside, but too much white on the outside, with the white wall. Then I choose a very light and pale shade of green for the outside of the door. I thought it would look faded and interesting, but it didn't. It was just plain ugly. I ended up with grey. And guess what: the green shines a little bit through the grey and I just love it! Not visible on the photo though... Anyway: a bit of sanding on the edges and here it is:


Enjoy your Sunday!
Marit

vrijdag 14 december 2012

X-mas house part 5: walls & chimney

For the interior I used scrappaper on the walls and floor. I wanted to glue painted woodsticks (to stir coffee or tea) on the lower parts of the wall, but I thought it would be so much work to paint them one by one. Then I had this idea of sticking them on Scotch tape for painting:

And then I thought I could not glue the sticks to the wall, before I had made a chimney! My mind is such a chaos!

I tried to give the mantelpiece a marble effect, but I didn't have enough patience. The chimney is made of styrfaom with samples of real wallpaper on them. The wallpaper has a bit of a pearl shine, does not show on the picture.

The marble floor tiles are a miniature tile paper.

And then the end result:
Now thinking about how to make a stove... and a garden... and more decoration... And I still need to decorate our real life house!

Bye for now,
Marit

woensdag 12 december 2012

X-mas house part 4: X-mas tree

Have been separated from the internet for 3 frightening days!!! My laptop had some troubles these past few weeks, and died Monday. But I know what will be waiting for me under the Christmas tree! Well, I still need to buy and decorate a full size Christmas tree, but I did make a miniature one. (And I do want a full size present this time, not a miniature one, like most years.)

Miniature Christmas trees aren't very realistic. I've read about using Lycopodium green, and I found it on a fair. (for Dutch readers: Silly Sisters sells packages to make a tree this way)


From left to right, as easy as that, really great!

Then some Christmas balls from beads with or without bead-caps.


Then the star at the top and a bit of glitter nailpolish to finish it.
My sister thinks Christmas trees are ugly. Her children grow up with an alternative tree, quite sad, I think. Lucky for them they spend the holidays at my parents house, and my mother -even though she hates Christmas trees as well, runs in the family- has two trees: one very stylish (boring) and colourmatching in the livingroom, and a big colourful one in the hall, because the grandchildren love that so much. 
Maybe it's a family thing, but when I think about it, I do think it's weird to place a tree in the house and dress it up. It would be silly to do that with any other plant. And still we demolish entire forests to do so, or even worse: get a plastic fake one. I feel it is pretty, but when I really think about it: a Christmas tree is not really pretty. It's tradition, contributing to the feel of the season.  But the little lights, oh, I would want them all year round!!!

Bye for now,
Marit

zondag 9 december 2012

X-mas house part 3

Back to the house again! When the clay on the walls of the houses, I saw that I should have kept the clay-sheet just a few mm higher and wider than the wood, as it shrinks while it dries. Stupid me, I know that!

Next step was to paint the stones and cracks. I used different shades of my aquarel-paint.

When it dried, I applied a layer of vaseline, in this case in the absence of any other: strawberry flavoured lipbalm ;-).

And then a thick layer of Gesso all over the house.

I should have faded the brickwork into the rest of the wall, and I should have applied multiple layers of Gesso. Lesson learned. Once the gesso is dry, it can be scratched of the parts with vaseline beneath it.

And the the end-result. Not bad for a first time, will try this again, but better.


Bye for now,
Marit

donderdag 6 december 2012

X-mas house part 2

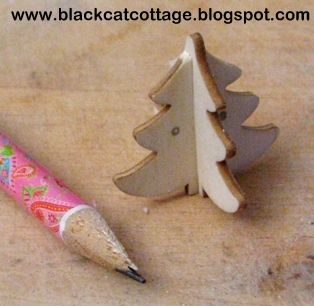
Before I go further with the house itselve, some decorations I made for it with lasercut woodsies. I love those! So many things one can do with them!

I probably don't need to explain how I made these, but I do it anyway. :-)


When the lines are sawn, the gap needs to be made wider, to be able slide the trees onto eachother. I used strips of sandpaper and a very fine file.


Then it's ready to paint and decorate. So on to the next project.
I started with cutting the 'ears' of the wooden piece, and painting it white. 

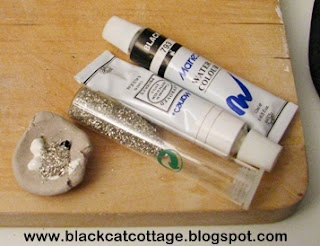
I wanted to fill up the gaps of the wooden lasercut piece with something sparkling. I mixed airdrying clay with black and white water colour paint (did not have grey), to contrast the white, and loads of glitter.


But that was not glittery enough for me, so I added some more, pure glitter.

Oh, and this is something every miniaturist (or scrapbooker, card-maker, etc) should have: a metal-coloured wax. I turns anything -plastic, paper, etc- in looking like being made of metal. Rub it lightly, and textures will show themselves. It's just FANTASTIC! I don't understand why it's so hard to get, any decent hobbyshop should sell this!


 I might add a glossy varnish on top of the cake-stand, not sure yet.

Hope you enjoyed it!
Marit